#
Preparing a Spreadsheet
The Qualys User Interface can behave unpredictably. It is possible to encounter difficulty even if these instructions are followed precisely. Do not hesitate to reach out to a manager for assitance.
#
Exporting Raw Data
Before you start preparing the spreadsheet, download the raw scan data. Do not upload it to Suralink unless instructed to.
- Navigate to the scans tab and select the appropriate scan.
- Click the blue downward arrow and select Download
- Choose CSV format from the popup.
Store in the engagement binder. Use the naming convention [Client] [Year] [IVA/EVA] RAW. You can sign off and check them in as they will not be needed again and are not used to prepare the deliverable. The remaining instructions on this page will cover preparation of the spreadsheet deliverable.
#
Download from Qualys
- Navigate to Reports -> Reports tab
- Select New -> Scan Report -> Template Based
From the New Scan Report dialog box:
- Select "Technical Summary Report by System" as the Report Template
- Set Tile of [Client] [Year] [IVA/EVA]
- Set format as CSV
- Check "Do not show header"
- Proceed to next page and choose the scan to use
- Click run and wait for report to complete
Internal scans may take several minutes before the report is available. It is ok to leave the page and return later.
- Select the down arrow next to the report name and click Download
#
Format the Spreadsheet
The download will be formatted as a comma separated values (CSV) file. This is not Excel's native format and does not allow formatting, formulas, etc.
- File -> Save As -> save to your workstation in XLSX format
- Immediately move the XLSX file to the engagement binder. If an engagement binder cannot be found, reach out to a manager for assistance.
- Further steps will be performed on the XLSX file in the binder.
#
Cleanup
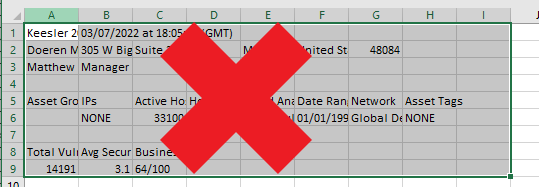
- Remove all data before the vulnerability results table. This is usually rows 1 through 10.
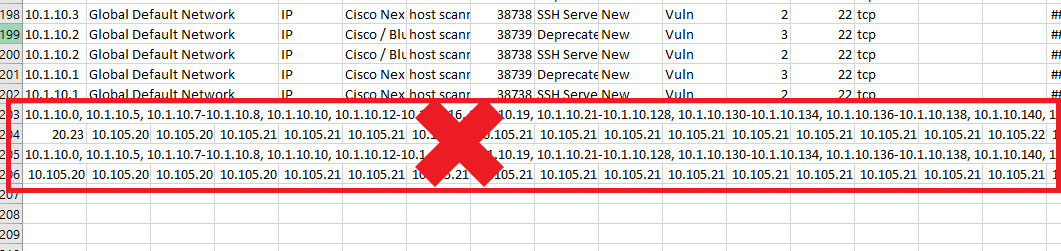
- Remove extra data at the end of the table for IPs with no vulnerabilities. You should see the text “No results available for these hosts” and “No vulnerabilities match your filters for these hosts” at the end of these rows. They may stretch into multiple rows depending on the number of IPs. Delete the entire rows.
- Delete the following columns if they are present:
- Network
- Tracking Method
- QID
- IP Status
- Vuln Status
- Type
- FQDN
- SSL
- First Detected
- Times Detected
- Date Last Fixed
- PCI Vuln
- Ticket State
- CVSS Environment
- Instance
- OS CPE
- Category
#
Formatting
- Move severity column to column
A - Format the data as a table and name the table
vuln
The table MUST extend all the way to the bottom of the data or the totals will be incorrect. To be safe, scroll to the bottom of the data and verify. The PG down key can be used to scroll quickly. END + DOWN ARROW can be used to jump to the end, but make sure it is actually the end.
- Type into cell A1, substituting for the correct values:
[Client] [Year] [IVA/EVA] - Enter Hosts Alive in cell
A3and the count in cellB3 - Set width of the Threat column to 175 and wrap text
- Set width of Impact, Solution, and Exploitability columns to 100 and wrap text
- Set width of the IP column to 18
- Set width of the DNS column to 33 and wrap text
- Set width of the Title column to 55 and wrap text
#
Calculating Totals
- Starting with cell
A5as the upper right corner, create the table shown below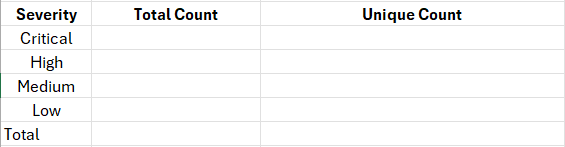
- Select the entire severity column except header and use Find and Replace to make the following replacements:
- 5 -> Critical
- 4 -> High
- 3 -> Medium
- 2 -> Low
- 1 -> Informational
- For the total count cells, enter the following formula and downfill:
=COUNTIF(vuln[Severity],A4) - For the Unique Count cells, enter the following formula and downfill:
=COUNTA(UNIQUE(FILTER(vuln[Title],vuln[Severity]=A4)))
If the total count is 0 for any of the severity levels, the unique count will display 1 instead of 0. This is uninited effect of how the formula is written. Until a fix is implemented, please manually enter 0 into the unique count.
- Use the SUM function to fill out the Total row.
#
Adding Color
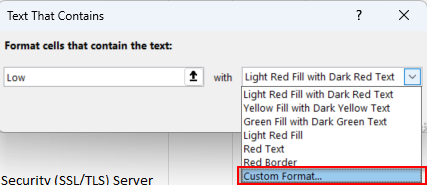
- Select the severity columnand navigate to Conditional Formatting -> Highlight Cells Rules -> Text that Contains...
- Enter the severity level in the first text box (you will repeat this for all five severity levels)
- Select Custom Format
- Select the Fill tab then click More Colors...
- Select the Custom tab and set the color according to the severity level, using the guide below:
- Low R146, G210, B161
- Medium R255, G240, B163
- High R244, G187, B68
- Critical R250, G134, B137
#
Final Formatting
- Center align the severity column
- AutoFit row height on the entire table (ALT + HOA)
- Middle align the entire table (ALT + HAM)
#
Upload to Suralink/Client Portal
Manager review is required prior to uploading. If a reviewer signoff is not present in the binder, reach out to a manger.
- Save the files out of Engagment and check for corrupted formulas.
- Create a Suralink with report using the [Client] [Year] [IVA/EVA] name format.
- Check the "allow download" box.
- Typically only the primary contact should be given access. Vulnerability information is sensitive and its easy to add more people to it later on if needed. Check with a manager if you are unsure who should have access.